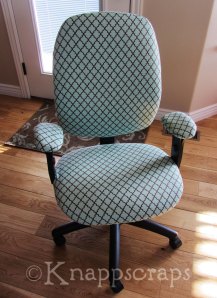
I have been working on a lot of little craft projects at home lately so I decided it was about time to spruce up my office at work a little too! After “pinning” some inspiration I decided to tackle the office chair first! I saw a tutorial post on She’s Crafty and then some wonderful color and pattern trends on Back on Festive Road, so I headed to Hobby Lobby for some fabric. My office is pretty plain and my chair is just a regular gray office chair so my main goal was to get a strong pattern and then that perfect POP of color. It was a toss-up between 2 different fabrics so I stepped out of the box a little and went with this:
It is sort of hard to tell from the picture but its a nice duck cloth that is robins egg blue with a brown pattern. Perfect pop of color and then I figured I could add blue accents throughout the office.
So my first step…. steal my office chair for the weekend! Then since its not “officially” my chair, I figured I should just make a slip cover and not get too crazy and disassemble the chair. So first I made a pattern. I had some white wrapping paper that I had left over from a Joyschool project that was the perfect size:
For the back of the chair, I just sewed 3 sides together and left the bottom open so I could just slip it on. The best way to get a snug fit is to put the cover on inside out, pin or mark it where it is loose and then sew again! To close the bottom I just pulled and folded it together as best I could and stapled it in place.
Then the chair pad cover is so easy! Just sew the edges over making about about a half inch sleeve with a little opening and thread some elastic through. Next, just slip it on and then pull it snug. I didn’t even bother to sew the seam closed since its just the bottom of the chair. I did the same thing for the arms pads. Not pretty underneath but very forgiving and easy! So voila! A perfectly covered chair. The girls called it my “happy chair”. It was perfect….
So then I take the chair to work………… and YUCK!!!!!! I seriously wanted to cry. It looked TERRIBLE! Everyone was calling it my “thin mint” chair. The color was horrible and it looked awful. It clashed with my wallpapered fake walls and was not good. Plus my office is a mess:
It looked so pretty at home with the natural light and the wood floors but in my office it was just off. I sat in that chair all day hoping it would get better but then ended up removing the cover at the end of the day. However, I was determined not to be defeated so that very night I went back to Hobby Lobby and bought fabric #2, the safer choice, that I knew I should’ve just picked to begin with! So much for outside-the-box pop of color! So I went with black and beige. My office furniture is dark so I figured this color and pattern would be rich and classy. The pattern was actually black on beige but I wanted it dark so I just flipped it over!
So, since I had already made a slipcover I had a pattern to use so the second cover took hardly any time at all to sew and didnt even require stealing the chair again! I am so happy I just did it right away and the result (the 2nd time) is perfect! This fabric is very heavy duty furniture fabric, so it feels so nice on the chair and it really goes nicely with the other furniture in my office. YEAH!
Staples didn’t really work through this thick fabric so the top part is just safety pinned on for now. Not really ideal, but it is so much better than the ‘thin-mint” chair so I just don’t really care! This is my happy chair and it makes me smile every time I walk in and see it.
I have quite a few more ideas for this space so stay tuned!
Filed under: Crafty Scraps | Leave a comment »


You must be logged in to post a comment.